How to get started with Hashicorp Vault for Secrets Management in your DevOps Pipeline – Part 1
- Jul 12, 2021
- 7 min read
Updated: Oct 28, 2021
The Danger of Improperly Stored Secrets
It’s the headline of the day: another company hacked due to compromised credentials. Data is stolen. Ransoms are required. Critical business functions are disrupted. Reputation is lost.
Yet, to move with the speed and agility digital business require today, automation must be used. And automation requires using stored secrets, or credentials, including…
Usernames and passwords,
AWS (Amazon Web Services) credentials in the form of a CSV file,
private keys,
API keys,
JSON web tokens (JWT)
SQL (database) usernames and passwords
Yet, the following scenario plays out too often:
A deadline is pressing. A developer or administrator needs to implement a fix fast. A QA tester needs to get the testing done now.
Figuring out how to store the credentials securely will take precious time.
An “I’ll clean it up later” approach is taken.
Credentials such as usernames and passwords are put into the code itself.
The code is stored in a source code management (SCM) platform or on a file system
The SCM or file system is replicated or backed up.
As a result, the credentials are stored insecurely in multiple places making compromise even more likely.
So how do you address the need to store secrets securely?
The Solution: Secrets Management (Credentials Vaulting)
The solution is to implement a secrets management, or vaulting, platform. Vaulting allows for credentials to be stored in an encrypted digital repository, or vault, and checked out by scripts and code at runtime. This enables automation such as CI/CD pipelines to use credentials AND do it securely.
The Objective: Implement Hashicorp Vault and Retrieve a Stored Secret
In this three-part blog series, we will cover how to implement and use a secrets management solution. I will walk through how to implement Hashicorp Vault® (or “Vault,” for short) and then retrieve a stored secret from the Vault.
Our objective is made up of two-parts:
Implement Hashicorp Vault
Retrieve a stored secret
So that you can replicate the solution yourself, I provide detailed steps with screenshots and specific commands. I also gathered information from various sources and websites to make building out the solution easier for you.
In this first blog post, I will give an overview of the solution including the following:
What Hashicorp Vault is
What “secrets” are
What “tokens” are and their significance
An overview of the environment that we will build out
Understanding Hashicorp Vault
HashicorpVault (or “Vault”, for short) is a product designed around the programmatic management of secrets. It acts as the centralized repository and broker for systems, applications, code, scripts, and users to retrieve secrets using a wide array of methods.
Authentication and Access to Vault
To gain access to the credentials stored in Vault, multiple authentication types are supported. Local authentication options include username and password authentication, public/private key pairs, and specialized authentication such as the AppRole functionality. AppRole functionality is unique to HashiCorp Vault and combines a shared ID/unique secret plus other attributes such as client IP address. External authentication options including LDAP, Kubernetes, AWS, Azure, and many other trusted system brokers.
Access rights to secrets are configured for each identity in Vault. Each identity can have a unique set of permissions associated with it to limit access to specific secrets stored in Vault. Figure 1 provides a high-level overview of the architecture of Vault.

Secrets
Along with the multiple authentication types, Vault also provides a high degree of flexibility for managing different types of secrets. Vault uses what are called “secrets engines.” Secrets engines are unique namespaces within Vault that interact with various types of systems that users need to access. (For a more detailed explanation of secrets engines capabilities in Vault, refer to the article here.)
A basic key/value pair system is built into Vault and can be used to store any typical secret. Vault can also be configured to generate dynamic secrets which provide temporary access to the resources represented by the secrets engine. For example, once configured with the appropriate permissions, the administrator can enable a secrets engine for a database. Typical databases have local database account security management. A system that needs to access the database can authenticate to Vault which will then dynamically generate a username/password on the database with the appropriate permissions and pass them to the system that needs access. Those credentials will expire and be removed from the database by Vault once the time to live (TTL) setting for the access has been reached.
Tokens

Within Vault, authentication and access are centered around tokens. Tokens are provided to systems or users once authenticated to Vault. Those tokens are then used to retrieve secrets from Vault.
Any functional access to Vault requires a token. For example, in the scripts we will cover in the blog, Vault is accessed using a Public/Private key pair to retrieve a token. Later, we access a secret via a REST API call which has the token in the header field. Tokens provide a layer of control to access. A TTL is assigned to each token so the token cannot be used once the TTL has expired. Tokens are also key to how logging is done as logging is centered around token access.
What we will be doing with Vault:
Installing Vault – We will install and configure Vault on an Ubuntu Linux system. We will set it up with the proper folder structure and permissions to run Vault. Then we will add configuration files and explain what each setting is for.
Creating a secret – We will enable the key/value pair functionality in Vault. We will then create a folder structure needed to store the secret. And then we will create a secret that we will ultimately retrieve from Vault.
Enabling and configuring certificate-based authentication – We will enable the PKI (public key infrastructure) role, create a CA (certificate authority), and generate a public/private key pair. We will then assign access permissions to the secret we created.
Accessing the secret – Finally, we will demonstrate the ability to retrieve a securely stored secret from Vault. We will use a Python script to retrieve the secret.
While the use case I will demonstrate here is basic, it will prove out the core functionality of vaulting and provide the foundation for future articles. In future articles, we will use more advanced features of Vault.
Overview of the Design and Implementation of the Solution
Before we launch into building out Vault, I want to provide an overview of the design and the major steps we will be taking.
We will be setting up two systems: Ubuntu Linux Server and Windows Desktop
An Ubuntu Linux server to host Vault, and
A Windows desktop with Python installed to act as a client for retrieving secrets from Vault.
To complete the steps below, you will need to have already built an Ubuntu Linux Server and a Windows Desktop. I used two virtual machines, one with Ubuntu 20.04 LTS (long-term support) and the other with Windows 10.
Within the Vault application itself, we will configure secrets and access policy. Authentication for the Windows desktop (client) to Vault (server) will be configured to use certificate-based authentication.
From the Windows desktop, we will access Vault using the client’s workstation certificate to retrieve a stored secret in the form of a key/value pair. Note that this is the key proof point of how Vault adds value: the secret is stored in and retrieved from Vault rather than in the code or SCM platform/repository.
To demonstrate the retrieval of the stored secret, we will be using a Python script, getsecrets.py, that executes REST calls to retrieve the stored secret.
Secrets Retrieval
The process to retrieve the secret from Vault via a client certificate has a few steps. Figure 3 below provides an overview of the secrets retrieval process. Below it, the steps of the process are described in detail.

The PKI secrets engine is used to generate a public/private key pair. Both pairs are then copied to the client device.
The public key from the client certificate in step 1 is used to create a certificate identity for authentication.
The client then uses its public/private key pair to authenticate and generate a token.
The token from step 3 has a policy attached that determines its access to secrets stored in Vault.
The token is sent to the client from Vault.
The token is then used to access the secret.
Ubuntu Linux System
We will use Ubuntu Linux to host the Vault system. Several directories need to be configured with specific permissions and files to allow Vault to run. Figure 4 provides an overview of the directory structure on the Ubuntu Linux server. A description of each directory is provided below.
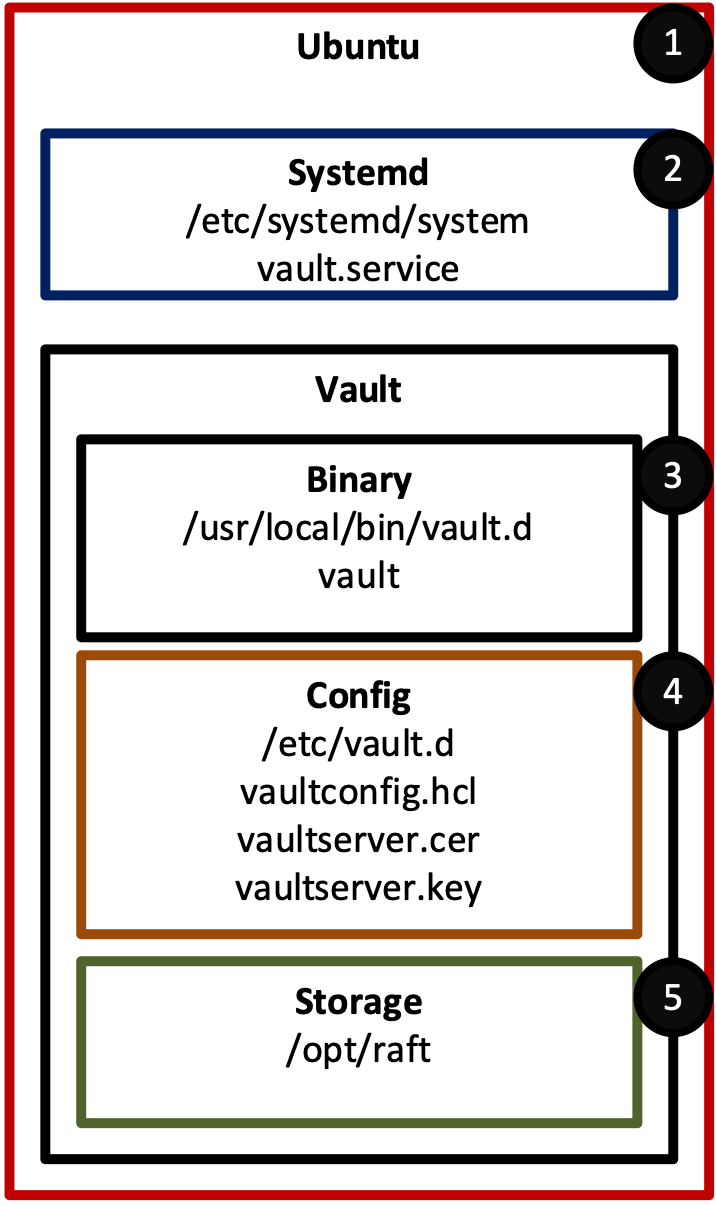
Ubuntu - Linux system to host Vault
Systemd (/etc/systemd) – Configuration file used to configure Vault to run as a service
Binary (/usr/local/bin/vault.d) – Directory where the Vault application binary is stored
Config (/etc/vault.d) – Directory used to store the Vault configuration files
Storage (/opt/raft) – Directory for the encrypted files that store secrets
Windows 10 Desktop with Python
For accessing Vault and proving that secrets can be retrieved from Vault, a Windows 10 Desktop will be used.
To demonstrate the functionality to retrieve a stored secret, a Python script will be used to retrieve the stored secret. To run Python, I used Visual Studio Code IDE (integrated development environment), but any development environment that can run Python should work.
Figure 5 is an overview diagram with explanations of the four (4) key components following.

Windows Client – Desktop system used to access Vault
IDE (VS Code) – Development environment used to run Python code
Python Scripts – Scripts that make REST API calls to access Vault
Client Certificate – Credential used to authenticate the client to Vault
Summary and What’s Next
In this blog we laid the conceptual foundation and overview needed to build out the Hashicorp Vault® environment. In the next blog (part 2 of 3) we will build out the Hashicorp Vault® environment. In our final blog in the series (part 3 of 3), we will retrieve a stored secret from Vault using a Python script. We’ll also have a small bonus step, so stick around!
To get a head start, make sure you have built out the two virtual machines you will need: the Ubuntu Linux Server and the Windows 10 Desktop.
Reach Out to Us
If you need more information about how to implement Hashicorp Vault® or another vaulting solution, or if you need help in automating your CI/CD pipeline, reach out to us.


Comments